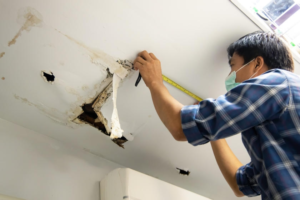
Insulation Removal Perth is a DIY project that requires extensive preparation and strict safety measures. First, homeowners should consider why they want to remove their insulation.
In many cases, addressing issues like moisture damage, mold, and rodent infestations is necessary. A professional attic inspection will help determine the best method of removal.
If you own an older home, chances are that your attic insulation needs to be updated or repaired. Poor insulation can lead to lower energy efficiency, reduced air quality, and even pest infestations. If your insulation isn’t performing well, it may be time to consider removing and replacing it. This task isn’t a do-it-yourself project for beginners. The costs associated with obtaining or renting the right equipment, the cost of old insulation disposal, and your time investment should be considered before you decide to take on this task.
The first step in preparing for attic insulation removal is to ensure that you have the right equipment. This includes a commercial-grade vacuum, a ladder, and a set of protective equipment. Gloves are an essential item for protecting your hands from sharp objects and potential irritants, while a mask will help to prevent inhalation of mold spores or other particles. Eye protection is also recommended to reduce the risk of irritants getting in your eyes. If possible, full-body coveralls are ideal to protect your skin from the harshness of cellulose insulation.
Once you have the appropriate gear, it’s time to clear out the attic space. This will help you to easily navigate the area while minimizing the amount of mess that is made in your living space. You should also clear out any items that are normally stored in the attic to avoid damaging or contaminating them during the process.
Depending on the type of insulation you have, removing it can be a messy job. It is a good idea to lay down some drop cloths to minimize the amount of mess that is made in your home. It is also recommended that you wear a face mask for extra protection during the removal process.
Once you’re finished removing the insulation, it’s a good idea to seal the attic access door. This will help to prevent air leakage in the future and increase your home’s energy efficiency. The best way to do this is by using a piece of rigid foam, but spray foam or caulk can also be used for this purpose.
Safety Measures
Insulation removal is an important part of maintaining a healthy and energy-efficient home. However, it can be dangerous if proper safety measures are not followed. Old insulation can contain environmental hazards like asbestos and may be infested with pests or mold, posing health risks for homeowners. Insulation also degrades over time, losing its insulating properties, making it less effective and increasing utility costs. This may be due to moisture damage, pest infestation, or simply ageing.
To ensure a safe and efficient process, it’s essential to establish a removal plan. This begins with an assessment of the attic space to identify the type and condition of insulation present. The attic should be cleared of obstacles and obstructions to make space for work, while protective coverings should be laid down to shield surfaces from damage or contamination. A clear workspace helps prevent injury to workers and ensures a smooth and seamless process. It’s also important to have the necessary personal protection gear, including a respirator mask or nose filter and gloves to minimize contact with dust, dirt, and insulation particles.
It’s important to note that electrical wiring can be located in the attic space, posing a significant risk of electric shock and fire during the removal process. It’s therefore crucial to turn off the power and disconnect all live wires before starting to remove insulation. This also prevents the accidental disturbance of insulation materials that may release airborne fibers.
Once the attic is clear and prepared for insulation removal, a professional insulation removal team can begin the work. Depending on the type of insulation, it may be removed by hand or machine. Hand removal is typically best for fiberglass batts, while spray foam is best for large spaces.
Once the attic space is empty of insulation, it’s vital to thoroughly clean and vacuum the area to eliminate any remnants or contaminated materials. This can be done with a high-powered vacuum cleaner, which also eliminates excess dust and particles and helps to maintain the cleanliness of the attic space. It’s also essential to ensure that any contaminated or hazardous materials are recycled or disposed of according to local regulations.
Preparation
Insulation is a vital component of a home’s structure, providing effective temperature regulation and enhancing indoor air quality. However, over time insulation can degrade due to various factors, including moisture, pest droppings, or fire damage. When this occurs, it may be necessary to remove the existing insulation and replace it with new materials. Insulation removal requires proper safety measures and a thorough inspection, ensuring the best results.
Before beginning, it is crucial to establish a workspace and plan out the process. Ensure there is a clear path from the attic access to the work area and protect surrounding surfaces with drop cloths or plastic. In addition, it is recommended to wear personal protective equipment to prevent inhalation of dangerous dust particles and other contaminants.
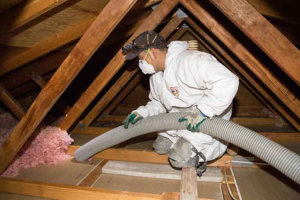
Once the attic is clear of obstructions, it’s important to set up a ladder and begin removing the old insulation. It’s also a good idea to take breaks frequently, as working in an attic for prolonged periods can cause fatigue and heat stress. Once the attic is empty, the contaminated insulation should be rolled up and placed in waste bags.
The final step in the process is a thorough vacuuming of the attic. Professionals will use industrial hoses to ensure the entire attic space is cleared of all debris, leaving nothing behind for future problems. This is particularly important if you’re planning to use the attic for another purpose, like rodent proofing or rewiring. Attempting to work around the old insulation can result in contamination of the new materials and compromised results.
Upgrading insulation can help improve energy efficiency, lower utility bills, and promote long-term comfort. Modern insulation materials, such as blown-in cellulose or spray foam, offer superior thermal performance and are less prone to degrading or contamination. To get the most out of your investment, it’s a good idea to consult with a qualified insulation contractor about the best options for your home. They can guide you on the different types of insulation, installation techniques, and energy-saving benefits. They’ll also be able to advise on the most cost-effective solutions for your project, based on the size of the attic, type of insulation, and any additional services you may require.
Disposal
Insulation removal can be messy, but it’s important to dispose of the insulation properly. This will ensure that the materials are not contaminated by rodents, mold, pests or other harmful organisms that could enter your living space, causing health issues or structural damage. This also helps to safeguard the environment, as improper disposal can lead to environmental hazards and potentially even legal consequences.
If you have blown-in fiberglass or cellulose insulation, the material can be recycled through your local waste management facility. Contact your facility to learn more about what to expect with regard to drop-off and processing options. However, if you have contaminated insulation, this material cannot be recycled and must be disposed of properly as hazardous waste.
Before handling insulation, always wear protective clothing, gloves, goggles and a respirator to prevent direct contact and inhalation of fibers. Make sure that the work area is well-ventilated and keep your children and pets out of the space to minimize the risk of irritation and exposure to harmful materials.
For cellulose insulation, it’s recommended that you use a high-powered vacuum to suck up the material and dispose of it in trash bags. It’s a good idea to place a tarp under the bags as you fill them to facilitate clean-up. Once the job is completed, make sure that you put the trash bags in a larger, higher-density bag for additional security and to limit air flow.
You can also safely dispose of fiberglass and mineral wool insulation by calling your local waste management facility to find out more about the process, including drop-off and processing options. You may have to pay a fee for these services.
The best way to handle the process of removing your old insulation is by hiring a professional service. They will have the proper equipment to remove batt insulation, including a vacuum system, decontaminating chemicals and rodent-proofing tools. Additionally, they will have the expertise needed to inspect the area and make recommendations for replacement materials. This will ensure that your home is safe and energy efficient and will help you save money in the long run.